flowchart LR
  A[rmarkdown] --> B(pandoc)
  B --> C(html)
  C --> D(Hugo)
  D --> E(Netlify)
This is the first post in a Quarto blog. Welcome!

OK, now that the stock photo is out of the way, let’s modify this to add some actually important content.
How to Port Your Blogdown-Hugo Website to Quarto
As a short introductory post, let’s talk about the elephant in the room: most of us here are riding a hype train and rushing to get hip with the Quarto times. That means many of us are moving our blogs from older, supposedly antiquated methods to the new offering by Quarto.
This is fine, but it also means that a lot of us are charting different paths on our way to the Quarto Mecca. Here, I want to talk about how Blogdown-Hugo-Netlify users should make the jump as painlessly as possible.
As you can imagine, the Blogdown-Hugo-Netlify site is one built by R users in blogdown, rendered by hugo with GitHub Pages, and served by Netlify. There’s nothing exceptionally wrong with this framework, but I have to admit that I did find it somewhat janky. I think that at the very least, I was willing to try Quarto if it were going to save me from some of the debugging that I had done in previous work on this site. Don’t get me wrong, it wasn’t a horrible experience, and it generated a much slicker product than vanilla GitHub pages, but it also wasn’t painless either.
Benefits of Quarto Pub
In my limited experience, the Quarto Pub approach has one major advantage — it cuts out the middlemen.
With the Blogdown-Hugo approach, we had to essentially cross our fingers that multiple independent programming steps would work:
With Quarto, the same essential pipeline is happening, but the intermediate steps between rmarkdown and Hugo are more opaquely integrated under the same system with quarto render and quarto publish. Even though the knitr engine (the thing that turns code chunks + markdown into HTML) still works behind the scene, it’s encapsulated much more cleanly in Quarto.
What’s more, so much of the layout theming and styling are available within Quarto out-of-the-box. With Hugo, you had to visit Jekyll to select the perfect theme from their selection, and learn what each of the Hugo theme settings were independently for each theme. With Quarto, themes appropriate for a website are available instantly, with minor tweaks made seamlessly, and you can confidently leave your major styling and customisation to an afterthought that you’ll get to later once it works.
The workflow with Quarto looks and feels more like this:
flowchart LR
  A[Quarto doc] --> B(html)
  B --> C(Netlify)
Importantly, blogging with Quarto also includes functionality to quickly and seamlessly deploy HTML on Netlify, with almost no config tinkering. That being said, let’s get to the actual instructions:
Making the Switch
So, what does someone on the Blogdown-Hugo-Netlify stack have to do to embrace Quarto? Well, step zero is to brace yourself — your website is going to go down for a bit, but it will come back, ok? There, there, don’t panic.
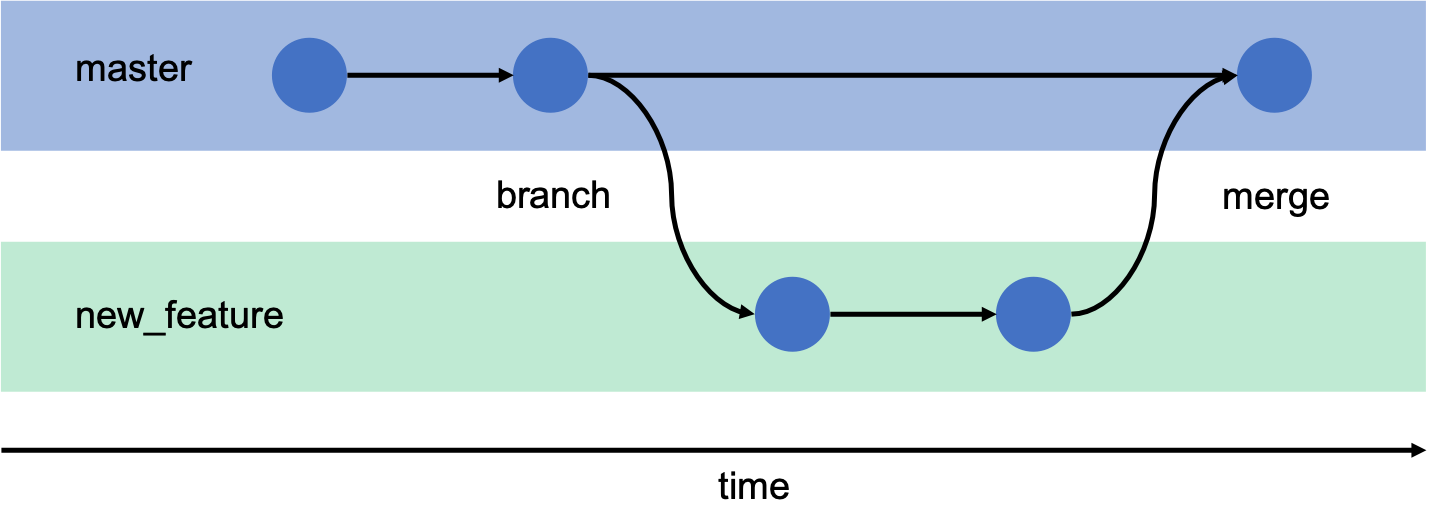
What we’re going to do is use a new branch to develop the barebones of your new Quarto site and merge it in to your existing codebase with GitHub Pull Requests, then attach that to a new Netlify project site to carry over your domain.
Important
Please note that if you have not purchased a domain through Netlify, this method will not work to preserve your project’s website name. In other words, if you’ve deployed your website without a custom domain, and its URL says something like eloquent-cucurucho-ad51e8.netlify.app you may lose your existing website’s URL with my method. Please proceed only if you’re willing to risk losing that URL. Additionally, if you have purchased a domain outside of Netlify, this method may still work but you will likely have to reach out to customer support.
1. Install Quarto 🛤️
Of course, you’re gonna wanna have Quarto installed. So go ahead and do that.
2. Version Control: Start a new blank branch 😶
If you’re deploying with Hugo+Netlify, you almost certainly have this deploying as a Github Action, which means you’ve been version controlling your website. This is good! Now, if your most recent changes aren’t up to date, go ahead and commit your work:
git add --all
git commit -m "saving before switching to quarto"
git push origin main # or origin master if you still have that
Now, create a new branch off of main:
git checkout -b quarto-portYou’re now on a new branch identical to your Hugo site.
# you can check your current branch with...
git status
3. Burn It Down 🔥
Awesome. Now destroy it.

Well, not all of it. You can keep things like README and .gitignore, and if you’re in RStudio you can keep your .Rproj and .Rprofile files.
Other than that, get rid of it. rm -r all the folders like content layout static themes, rm your configs with something like rm *.toml. I also had a .nojekyll file I removed too. Honestly, we’re going for a fresh start here, so only leave behind your .Rproj and specific R associated files. Trust me.
4. Rev Up Quarto 🚗
Now, you can closely follow the Getting Started Guide for websites, but the basic steps are to run:
# from the project directory, so it inherits the site name from the directory name
quarto create-project --type website

# to view the barebones site
quarto preview mysite
If successful, you’ll have a default site ready!
(base) Tinashes-Mini:foo tinashetapera$ tree .
.
├── _quarto.yml
├── about.qmd
├── index.qmd
├── posts
│   ├── _metadata.yml
│   ├── post-with-code
│   │   ├── image.jpg
│   │   └── index.qmd
│   └── welcome
│       ├── index.qmd
│       └── thumbnail.jpg
├── profile.jpg
└── styles.css

3 directories, 10 files
5. Bring in Your Posts ⛹️
Here’s the critical step. You’re going to use git to move your blog posts (probably .md or .Rmd) from your main branch into this branch. You can do this for each individual file like so:
# my Hugo "blog" used to live in `/content/blog`

git checkout main -- content/blog/post1.Rmd  # use master if that's what you have
This then creates the directory and file for you in your quarto-port branch, including its git history:
(base) Tinashes-Mini:foo tinashetapera$ tree
.
├── _quarto.yml
├── about.qmd
├── content
│   └── blog
│       └── post1.Rmd
├── index.qmd
├── posts
│   ├── _metadata.yml
│   ├── post-with-code
│   │   ├── image.jpg
│   │   └── index.qmd
│   └── welcome
│       ├── index.qmd
│       └── thumbnail.jpg
├── profile.jpg
└── styles.css

5 directories, 11 files
Then, mv this file to move it to where Quarto blogs maintain their blog post files, and rename it to .qmd:
mkdir -p posts/post1
mv content/blog/post1.Rmd posts/post1/post1.qmd
You can now open and render your new Quarto Markdown document to see if it plays well with the blog. I had to remove one YAML header key (comments) for it to work, but after that I pretty much had the file rendered identically to as it had been on the Hugo site.
6. Rinse & Repeat… Or Automate? 🤖
I had so few posts that I decided against trying to automate this process, but it wouldn’t be that hard I imagine.
# PSEUDOCODE INCOMING

posts = listfiles( main-branch -- content/blog/*.Rmd )

for p in posts:
    mkdir posts/$p
    git checkout $p
    mv $p.Rmd posts/$p.qmd
    sed "comments" replace with "#comments" $p
Something like that?
Once you’re all done moving files, remember to preview your site with:
quarto preview .At this stage, you can choose to tinker with the aesthetics, navigation, structure, and content of your blog, but that’s not what this post will instruct on. For that, please see Albert Rapp’s fantastic post on the subject.
7. Destroy Your Netlify ⚡
Caution
Now entering the Danger Zone! If anybody knows how to get from here to the end of step 8 without burning this part down, let me know. But if you have a custom domain from Netlify, you should be all good and can proceed with this step with confidence.
Now, here’s the emotionally difficult part – you’re going to have to take down your current Netlify site. To do this, first uncouple your custom domain from the site project, by going to Site Settings ➡️ Domain management (in the sidebar) and scrolling down to Custom Domains. For each of the two lines with your custom domain under them, just hit Options ➡️ Remove Domain.
Now, go to your Netlify profile and to Team ➡️ Sites ➡️ <Your Site> ➡️ Site Settings and scroll all the way down to the scary DELETE SITE button.
Do it… trust me.

8. Enable Quarto Publishing with GitHub Actions ⚡➕🤖
Now, closely follow the Quarto docs to initialise a new Netlify project:
quarto publish netlifyThis will create a new project in Netlify for your site and deploy it on a new funky-named project URL. You can use that to take a look and make sure everything looks decent on the web.
Next, closely follow Quarto’s GitHub Actions docs:
In your Quarto’s
_publish.ymlfile, modify theurl:tag and insert your custom domain. This will instruct Netlify to deploy this site to your domain.Create the GitHub actions workflow file as instructed; the default one in the docs worked for me (
.github/workflows/publish.yml):
on:
  workflow_dispatch:
  push:
    branches: main

name: Quarto Publish

jobs:
  build-deploy:
    runs-on: ubuntu-latest
    steps:
      - name: Check out repository
        uses: actions/checkout@v2

      - name: Set up Quarto
        uses: quarto-dev/quarto-actions/setup@v2

      - name: Render and Publish
        uses: quarto-dev/quarto-actions/publish@v2
        with:
          target: netlify
NETLIFY_AUTH_TOKEN: ${{ secrets.NETLIFY_AUTH_TOKEN }}- Closely follow instructions to setup your token authentication, including the “Ignoring Output” section.
9. Create a Pull Request on GitHub 🤖
Now comes the magic, you’re going to merge your changes from this branch into your main branch. You can do this at the command line, in RStudio, or in Github (I preferred the command line with gh), but on GitHub what you’ll do is:
Save your changes and publish your
quarto-portbranch to GitHub withgitgit add –all git commit -m “modified quarto config” # insert better message here
git push -u origin quarto-port
In GitHub, create a Pull Request to merge your
quarto-port(which you’ll punch into the “compare: X” drop-down) into your main branch. Managing Pull Requests is not the topic of this post but don’t panic if you see any merge conflicts — just make sure to select your incoming changes and not reject them.
You can read a comprehensive guide to pull requests here.
If successful, all of your changes should now be on the main branch of your website’s GitHub Repo…which means…
10. Netlify Deployed! 🎁
At this stage, the pull request merging successfully should trigger an automatic build on GitHub Actions (you can check that with the Actions tab as with Hugo) and the new config should be sent to the Netlify site. To enable your custom domain, go to Site Settings ➡️ Domain management, then select Add custom domain as normal. If your domain was bought from Netlify, it should autoconfigure instantly, and be redeployed in a few minutes.
Conclusion

So, that’s how I ported over this site. It did take some tinkering, at first, I’ll admit. I tried a number of times to just override the existing Netlify project’s Hugo build system and get it to respond to the Quarto + GitHub Actions workflow, but to no avail. What I found easier was to just toss the old Netlify project, update the version-controlled codebase, launch a new Netlify project, and transfer the old domain name to it!
I hope everyone found this post helpful. And if not… well, I’m sorry no refunds.